How do you make new elements in a match-3 game? And how do you create levels and work with analytics? Aleksandr Shilyaev, lead game designer at Playrix, explains how the studio addressed these challenges while working on its hit title Gardenscapes.
What follows is an edited transcript of Aleksandr’s presentation at White Nights St.Petersburg.

Aleksandr Shilyaev
At Playrix, I’m in charge of match-3 gameplay in Gardenscapes. I’d like to talk about one of the most interesting stages in a match-3 project – creating new elements. I’ll also touch on analytics and A/B testing.
The things that I am going to talk about and that I break up into separate points are development milestones. It’s important to make it clear that we keep all the development stages in mind simultaneously and try to think ahead about any problems that may arise in the future.
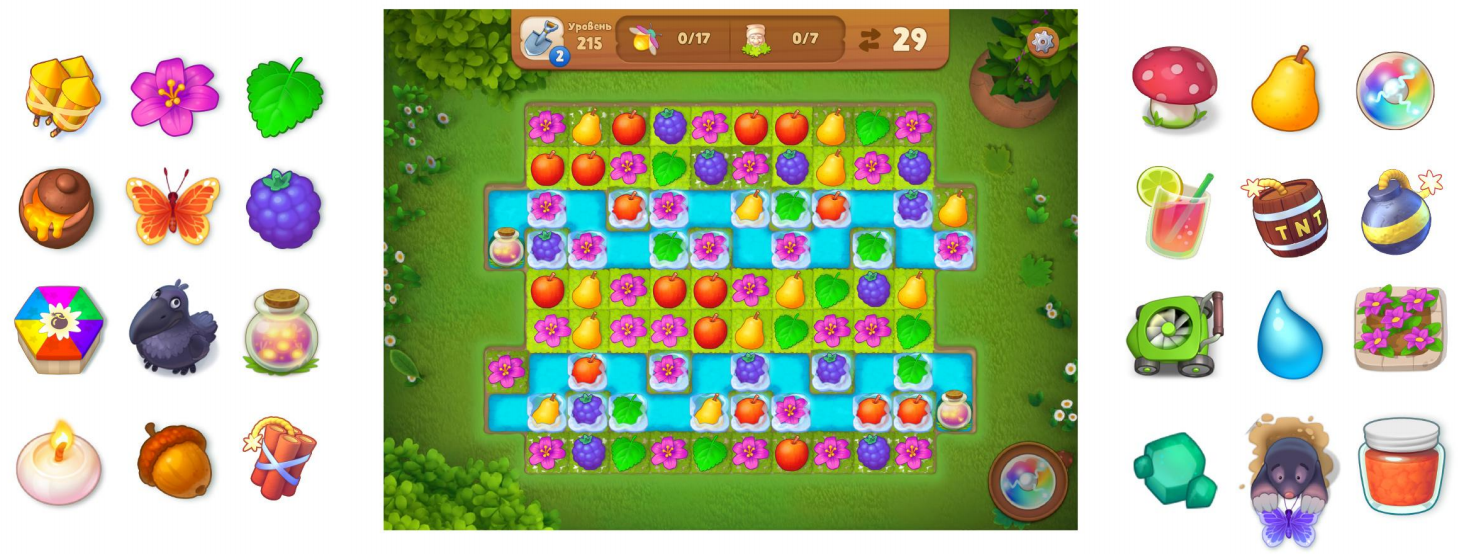
Back in 2016, when we soft-launched, we had 16 kinds of mechanics across 300 levels.
Half a year later, Gardenscapes already had 29 kinds of mechanics across 1,300 levels.
With each update, we try to add one or two new mechanics.
Creating a new item
Stage One: Studying the Competition
So we need to create a new element. Where do we begin?
We start by looking at our competitors. This is a very important stage that many people seem to forget.
There are a lot of cool games on the match-3 market that you absolutely have to know.
Before embarking on your own match-3 adventure, whether it’s the development of a new element or the creation of levels, you need to remember that your competitors have already done something like this.
So you look at what they’ve done, and if it’s a good idea, you analyze it, polish it, and make it work for your project.
Stage Two: Generating and Filtering Ideas
Now that we’ve studied the competition, we can begin developing a new element.
At this stage, we put all of our initial ideas into a single document. It often happens that we have over 20 or 30 of these. We keep the good ideas and filter out the bad ones.
How do we decide which ideas we should keep and which we should reject? It’s simple: you just need to remember the specifics of your game.
Gardenscapes, for example, is a match-3 game that allows players to continuously make matches without any pauses, with non-color-specific bonuses, and a cumulative “Lightning” bonus.
These features put certain limitations on the range of mechanics we can choose from. For example, we can’t choose a mechanic that isn’t triggered immediately, since it would block the field, interfere with the effects, and basically give our game a completely different feel.
When we’ve put together a master list and filtered out the bad ideas, a group of experts selects 2–3 mechanics that seem the most promising. This is an important stage where we only focus on 2 or 3 elements.
Stage Three: Prototyping
After the experts have made their decision, and we’ve selected certain mechanics, we move on to the next stage, which is prototyping. On this stage, we can see how the element combines with the tiles, how it combines with other match-3 elements, and how it affects the experience of the game. You need to look at all of these aspects during prototyping.
What do we get in the end? An element that’s ready and has tested well during the prototyping stage.
Stage Four: Image Creation
Once we’ve decided on the concept, we move on to creating the visuals for the element.
This stage is no easier than the previous ones. The main difficulty lies in the fact that the player interacts with the image of the element, so it must reflect all the properties that you associate with the concept.
Before you can start working on the image, you need to define the setting of the game.
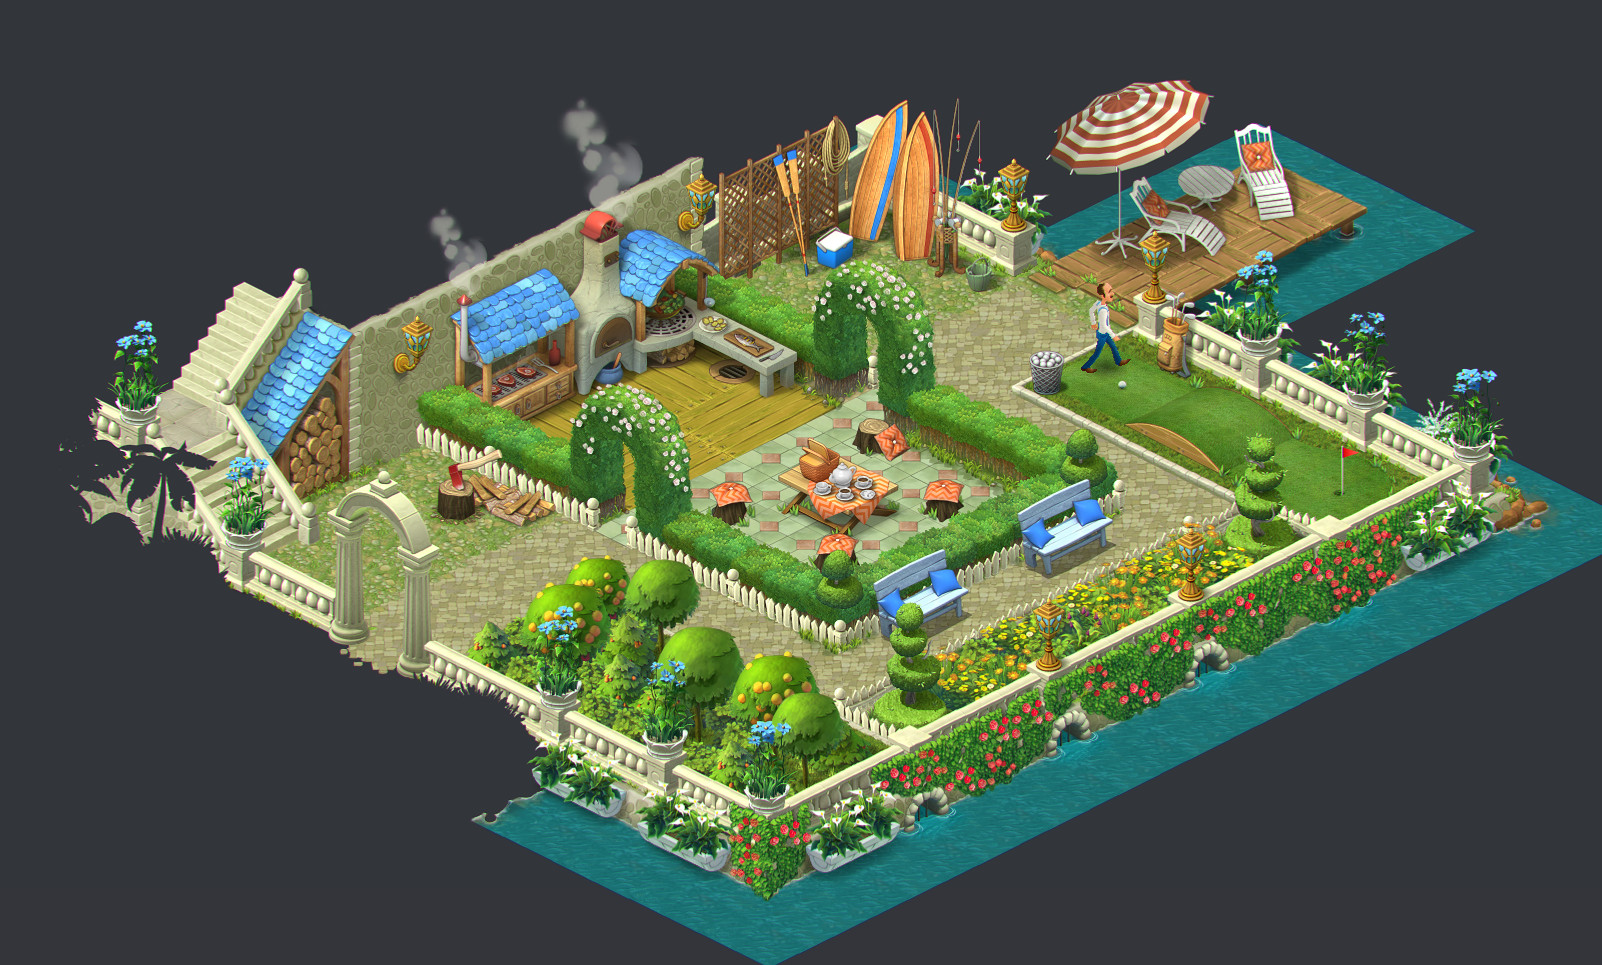
Gardenscapes is a game about gardening, and all match-3 elements revolve around that concept. They’re all either the elements of a garden or elements from the real world in which Austin (the game’s protagonist) lives. There are no fantastical objects with amorphous properties in the game.
Once we’ve understood the setting, we can choose the element’s properties. Each element can have a number of properties — it all depends on the individual element.
Take the blockers in Gardenscapes, for example. Blockers, like Boxes, are elements that fill a tile, leaving no empty space. So the player understands that the Box is tied to the field and isn’t going anywhere. This is one of its properties.
Another example is boosters. In Gardenscapes, each booster has a small, glowing animation. When the player sees one of these elements on the match-3 field, they immediately identify it as unique and begin to strategize about how they can use it.
Once we’ve prepared the properties of the element, it’s important to check them against the general visuals of the game. The item won’t exist in isolation. It’ll coexist with other elements and features. It’s very important to keep that in mind and take it into account in advance.
You should make sure that the element doesn’t stand out too much and doesn’t get lost because of its color. It should also fit in in terms of scale and level of detail. At this stage, it’s best to consult an artist who can tell you which directions to go in.
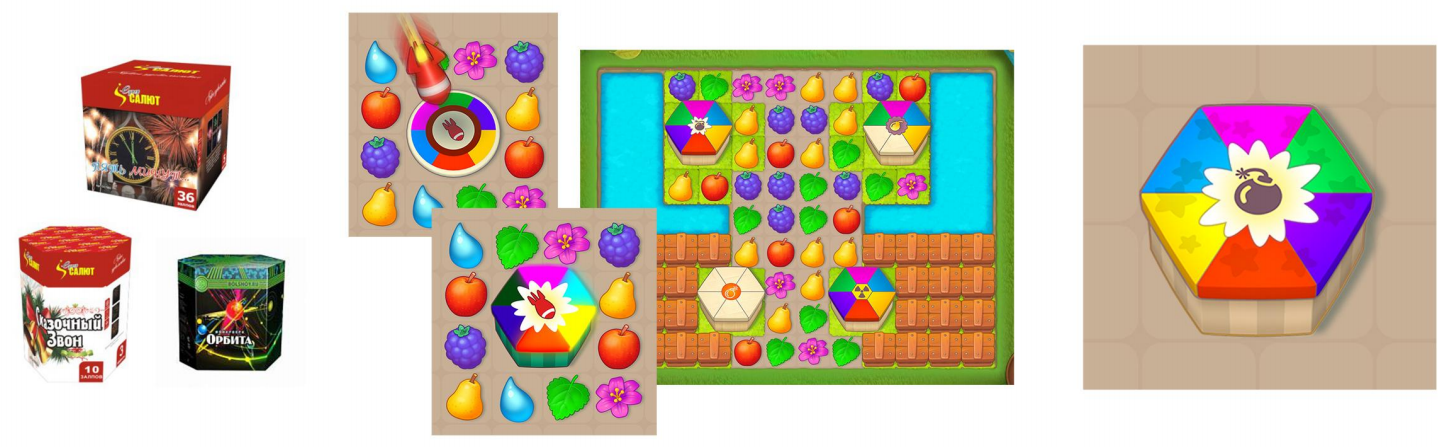
Let’s take the example of our fireworks element. You probably know what it is if you’ve played long enough.
We had the following task: we needed to make an impact across the entire field with the help of one element. The best idea we came up with was to make it in the form of a big firework, an item that could realistically be found in one of Austin’s closets.
We found references and made some sketches. Next, we started working on the properties of the element.
The element is tied to the field, doesn’t move anywhere and responds to matches. Therefore, we minimized the space around the element, added colors to its sections that correspond to the game’s pieces, and added a bomb icon, to give players the idea of an explosion.
Stage Five: Introducing the Element
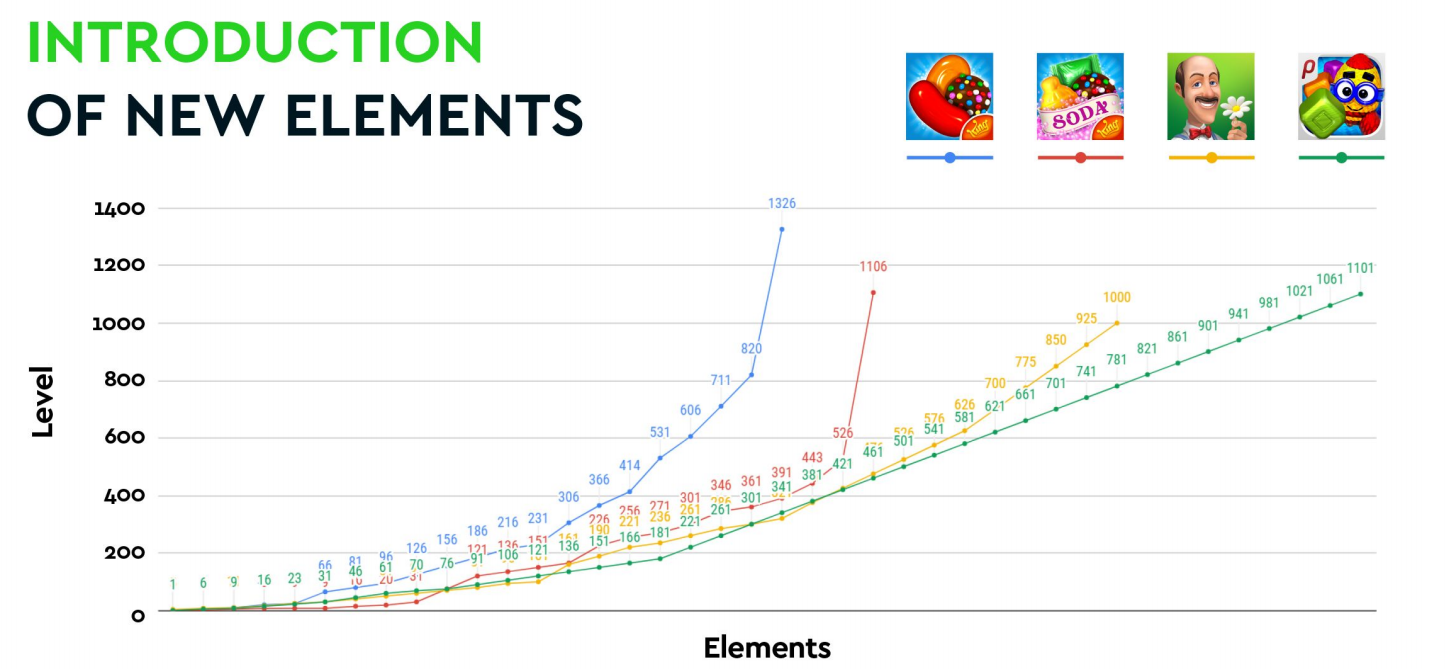
Once the element is ready, we need to add it to our introduction system. At the start of the game, new elements are introduced at a very high rate, and the elements themselves are very diverse. The longer you play, the more elements there are, and the levels themselves become more interesting. However, at some point, new elements are no longer introduced as frequently.
Before we make a decision, we don’t just go with our gut. We analyze our competitors. The graph below shows a comparison of Gardenscapes to three popular match-3 games. You can see that our introduction curve is consistent with that of our competitors (Gardenscapes is yellow).
So, we’ve prepared an element and made it part of our element introduction system. Now we start to make levels.
Level design
Before you start creating levels, it’s essential to decide on two things: the order in which elements will be introduced (which elements are you going to introduce and on which levels) and the difficulty curve (how exactly the difficulty increases or decreases from level to level).
We have a document that says where in the game each level is located and what requirements it needs to meet. This includes difficulty, goals, the number of elements used in this level, and so on. In fact, we put together a statement of work for the level designers which they use when making levels.
So we have this document and passed it on to the level designers. Now we need to discuss what they should take into account when designing a particular level.
There are only four basic requirements:
a) There should be no more than three or four elements per level.
You can break this rule occasionally, but it’s best not to overdo it. Otherwise, the level starts to feel chaotic. It’s confusing for the player, and it can be tough to navigate.
b) The elements need to be compatible.
Not all elements combine well with each other. We keep track of which combinations are possible and which are not in a master document.
For example, you won’t find a level in Gardenscapes where Ivy and Honey are used together. These elements are locked in the combination document.
c) Each level should have an idea.
Each new element creates new ideas.
For example, a certain level might require a special strategy, or it can be completely random, where you just need to set off a lot of boosters and collect bonuses.
A level can have an interesting beginning, where you need to blow something up and each time you get a new drop, or it can have a pre-set match that you have to make, and every time you play it, it’ll be exactly the same.
d) You should be able to beat every match-3 level in your game without using boosters.
What do we do once we’ve prepared a level that fits our difficulty curve? We start playing it.
When the level designer fine-tunes the levels, they design them according to the “projected difficulty curve” as described in our master document. How the designer does it is a whole other matter. It all depends on the skills of the level designer. Knowing that the level should have an 80% difficulty, the designer can achieve this by using settings such as the number of moves, the Lightning fill rate, and so on.
But it takes more than a level designer to get the full picture. We have a special department of playtesters with new people constantly coming on board. Their task is to play levels in the same way that real players would. We take their stats to adjust the difficulty of each level.
How do we analyze levels?
We don’t stop working on the level even once it goes into production. At that point, the work begins on analyzing and improving the overall curve and the individual levels.
We begin analyzing levels 2–3 weeks into production. To conduct our analysis, we need raw data from our players and the data that the game sends to our analytical database. So you play, you go through the game, and as you do that, the game is sending us information about what you do.
However, analytics don’t tell how to fix everything.
What can’t be fixed with the help of analytics?
1) Bugs
Bugs are errors that interfere with the game or make it impossible to complete a level. Very often, you can spot levels with bugs by seeing drastic changes in the level properties, such as difficulty, booster usage, goals that players fail to meet, and so on.
2) Inconsistencies in the difficulty curve
When a level designer makes a level, they set the difficulty. When the playtesters complete a level, they adjust the difficulty. Still, this often will be very different from what we ultimately get in the game.
So what we do is compare the two curves. The first curve is the projected difficulty, and the second is the difficulty curve based on players’ actual results in the level. Where the curves diverge, there is likely to be a problem, and we pay special attention to those places.
3) Long level sequences with the same difficulty
Again, sometimes playtesting is not enough. Sometimes you get several levels in a row that have the same difficulty. This is especially critical for levels that have a 92%, 93%, or 95% difficulty. This is something that happened in Gardenscapes, and we had to find it and fix it.
If you throw several difficult levels in a row at the player, they can get demoralized and stop playing. So you have to really look out for chains of levels like that.
A/B Testing
What should you do if you’ve analyzed a level, found the problem, and want to decide how to change the level? To answer this, we use the A/B testing system.
Let me tell you a little about the level metrics we look at.
- The first one is difficulty. As I said, this is the ratio of the number of losses to the total number of attempts.
- The second is the dropout rate or the percentage of players who have not completed this level for 7 days and have not been active in the game since.
- The third is the number of attempts before winning.
- The fourth is conversion and monetization. With conversion, it’s clear when the player made a purchase in the level, and by monetization, we mean the number of coins that the player spent to complete the level. So it’s not boosters, but the total amount, the number of coins.
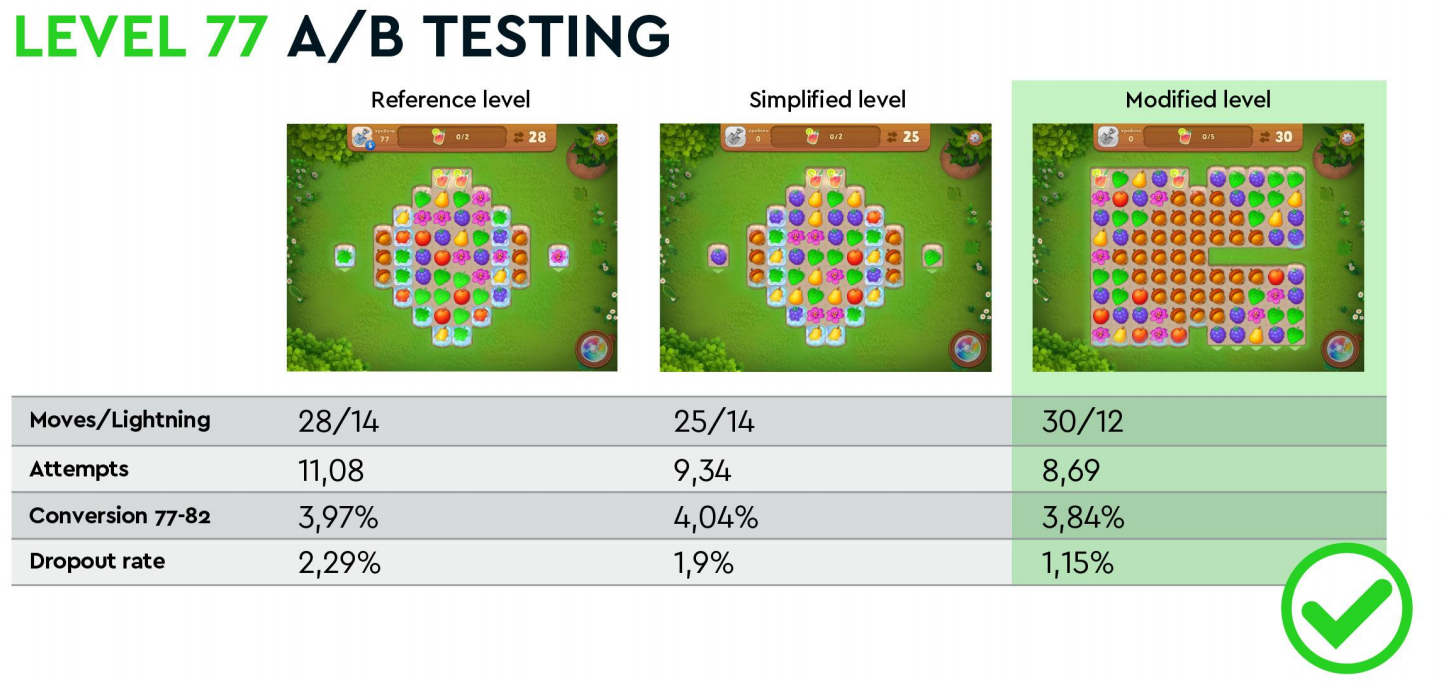
How do we test the level? We divide the players into three groups. We let the first group play the level in its current state, the second one plays an easier version of the level, and the third group of players gets a completely new version of the level. Then we watch them play these levels. After a few weeks, we start to see the real picture. That’s when we decide whether to keep the level as it is, take the easier version, or go with a completely new version.
Here is level 77, for example. This is one of the first paywalls in the game. The main problem of the reference level (which is on the left of the slide) is a very high dropout rate, 2.29%. This is critical because we have this level early in the game. If we lose many players here, it affects the earnings of the whole game in the future.
So we needed to decrease the dropout metrics. We made a simplified level, we made a whole new level, and then we conducted a test. The test results showed that the dropout rate was lower for the totally new level. However, monetization, conversion, and ARPU also slightly decreased. The simplified version improved monetization, but the dropout rate was still very high. We decided that at this stage, it is more important for us to reduce the dropout rate. So we went with the new level.
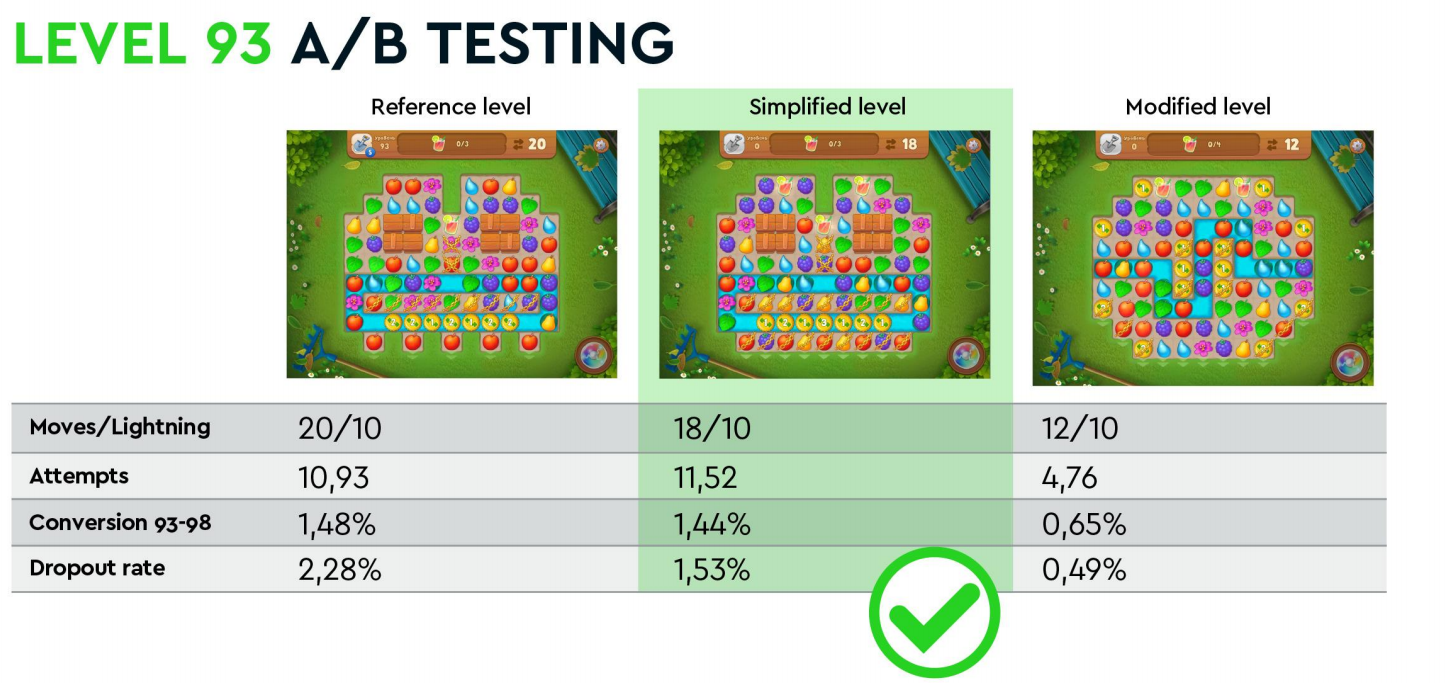
The next example is level 93, a more difficult situation. In this level, we had a high dropout rate. So we did A/B testing and here’s what we saw: the new level (on the right) has a very good dropout situation, the players almost never quit. But the monetization metrics are very low. We tried to strike a balance here. The simplified version reduced the dropout rate, and the monetization metrics only decreased a little bit. So we decided to keep this level because it retains more players, and we earn almost as much as with the original level.
To fine-tune match-3 gameplay, you have to strike a balance between monetization and retention. If you have a difficult level where you want to reduce the dropout rate, it’s not enough to just add moves and make it easier, because your monetization metrics will also decrease. The opposite is also true: if you have an easy level, and you want to improve monetization, it’s not enough to just make it more difficult because you would also lose players.
Monetization and dropout metrics are closely connected.
Takeaways
To develop the match-3 part of your game, you need to follow four rules:
- add new elements and mechanics to keep the player interested in the match-3 mode;
- keep a close eye on the visual integrity so that the game doesn’t become visually messy;
- analyze the level flow so you can respond timely to errors made during the level design stage;
- conduct A/B testing or similar tests to improve monetization and retention.
But most importantly, you need to have a good game to begin with. The game should have a well-developed system, smart element introduction, and cool levels to keep players engaged in the early stages.